Tuesday, May 15, 2012

Card Creating Tuesday with My Cricut Craft room and card sketch challenge


Hi All! Today is Card Creating Tuesday again and this weeks sketch was wonderful. I haven't always been a fan of sketches but since joining the design team I have grown to love them.


                                    Here is this weeks sketch


So for this sketch I decided to use the dress on the Sweetheart cartridge and I used Accent Essentials.

Take a look at my card then I will tell you all about it!


Sweet Heart Cartridge: Dress pg 58 cut in black pearl paper  cut @ 4.6
                                    cut layer 1 polka dot vellum.  I used my Gypsy  and hid the veil and waist part. 
                                    Top note shape: pg 74 on shift and shadow cut at 3.59 embossed with Swiss dots                             

Accent Essentials: Scallop square cut in black pearl paper @1.59
                             square cut in white @ 1.27

I wanted to keep this card simple and elegant so I used a black and white theme. The card base is a 5 by 7 card. I cut the back ground paper at 4 3/4 by 6 3/4. 

on the white squares I use a TPC Stuido stamps set. I could find  a name on it.  and then I added a small rhinestone to the corner of each. 

I just love the card this card turned out. I hope that you will all play along with the card sketch over at My Cricut Craft Room.   


* if this post seems scattered please forgive me. I had surgery on May 10th and I am still a little out of it.*


Crafty Hugs!!!!
Sarah


I am also entering this card Fantabulous cricut Challenge

Monday, May 7, 2012

Letter of the Day, Today's letter is S

Hi Friends!
I hope you are all doing well. It is Letter of the day again over at My Cricut Craft Room.
The design team is to create a project or card using a cartridge or cut or create something  that starts with the letter S.  
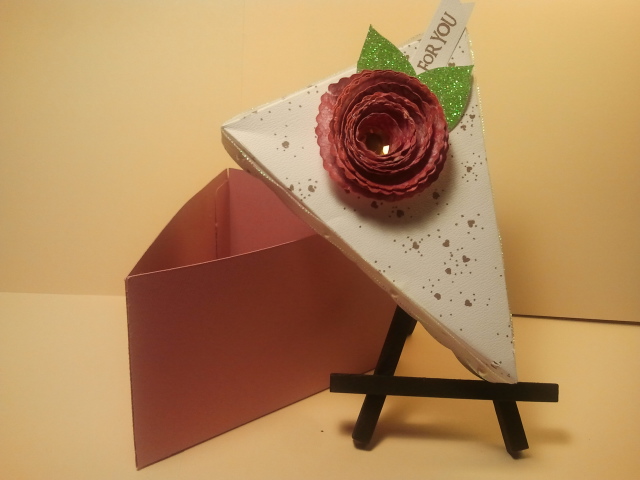
Since this month we are focusing on weddings I decided to use sweet tooth boxes project cricut cartridge( on sale at Erica's craft room for $20) to make a wedding cake favor box. 


Here is a peek at my project, then I tell you what I did!


The box is starts on page 10. So let me quickly explain how this cartridge works. each cut is in one column on the overlay. Like this box uses buttons 1,11,21,31, and 41. 
For my box I used buttons 1 which is the base and button 31 which is the top. 
Both cuts are at 11" 
for the top I used the colorbok white cardstock and the bottom is from Bazzill cardstock. 


It was super easy to score and assemble. 
For the top of the box I used a back ground stamp from close to my heart and cocoa brown ink from memoto and randomly stamped the box lid. 
I then added some shear ribbon on the sides and flat back pearls. 
I used flower shoppe to make the rose on top and I sprayed it with cranberry glimmer mist and inked with worn lipstick distress ink. I added a large rhinestone to the center. The leaves are just hand cut from some walmart glitter paper. 


here are some views of the box.


 oh I made a flag and stamped for you( also from ctmh) 


The pictures do not do it justice.  
Thanks so much for stopping by!


To see more projects using the letter S please visit My Cricut Craft Room to see what the other design team sisters have made.


Crafty Hugs 
Sarah
Saturday, May 5, 2012

May 100 Cartridge blog hop!!!!


Welcome to My Cricut Craft Room's
100 Cricut Cartridge Blog Hop

You should have started at http://mycricutcraftroom.blogspot.com/  if not please start at the beginning


Be sure to visit Erica's Blog  tomorrow for over 50 NEW projects that you did not see today....
Also make sure to follow Erica's blog so you will know when she has contests, prizes, challenges, swaps & special online coupons.


Hi All! Hope you are enjoying your weekend. Thanks for hopping along with us this week. 


You should have came from                                              If you just happened along this hop make sure you start over at Erica's blog.
I will have the entire line up at the bottom in case you get lost along the way.


Ok I have a lot to share so lets get started. 
For my 1st project I used Simply Charmed to create a easel post it not holder. 
                                        Here is the picture 


Recipe for sucess:
       Cuts: paper pg 53 cut @ 3 1/2
                 pencil pg 53 cut @ 2 1/2


for card base: 4 1/4 by 11 piece of cardstock 
                         score at 5 1/2 and 8 1/2
top or easel part of card. 4 1/4 by 5 1/2 
white paper cut @ 4 by 5 1/4
plaid paper cut @3 3/4 by 5


post it note
fold the card base at score lines . so it looks like this

Add the top of card to the folded area to create the easel look. 
Then add the paper layers.  


attach the post it note with strong tape, like scor tape. 


Next I added the die cuts. I popped up the paper and the pencil with foam dots. 
Thursday, May 3, 2012

Theme Day Thursday w/ My Cricut Craft Room


Hi Guy! It's time for Theme Day Thursday again. This week the theme was any Cricut cartridge. 
I had luckily just got Birthday Bash in the mail and was excited to use it. 
I will tell you this, I love this cartridge. It has so many great cuts and it also has a card feature to cut out great shaped cards, phrases,tags and font. It is wonderful. Oh and it has those cute little banner shapes that we all love. 


So I will show you the card and then tell you what I did!


I cut the card base in Kraft card stock from pg 31 at 5"
The purple layer was cut from the same page using the shift mode of the card feature button. I then used the birthday cuttle bug folder and them wet embossed it with clear embossing powder.
I cut the hedgehog from pg 40 at 3.5" I used my versa mark pen to add some texture to his fur and give him an outline. 
I used some crystal stickles on his hat and blowy thing( dont know the real name) 


The banner is fussy cut from some echo park paper and I added orange stickles  and the same crystal stickles. I tied some twine at the banner. 


To finish it up I used my white jelly roll pen to do some stitching around the outer part of the card. 


To see more projects like mine please visit My Cricut Craft Room to see what the other Design team members have made.


Before you rush off  I have some great news for you.. Erica has a coupon code for you to use at her store. She has been a busy girl and has 1000's of new products in her store and she is marking them down for Mothers day! Thats right 33% off in May.  Keep reading to find out about the code ..


ALL prices in my store will be marked down to 33% off for an entire month!


In honor of Mother's Day ---So hopefully knowing the items will be on sale for a month you might be able to treat yourself to a little shopping :) If not hopefully you will see an idea on here someday that you like and you can make with supplies that you have at home for free. There are so many GREAT ideas here every week. I hope that you do find something you like.
Because it takes SO LONG to add items to the store we have been working on that so the sale prices are not reflected yet.

So in the meantime please use this code for 33% off

33
Cricut Cartridge prices dropped AGAIN :)
Well not for me, but I lowered them for you!

This is for all Mothers out there. Although you don't have to be a mom to take advantage of our sale. So during the 3rd step of check just enter 33 as the coupon code and you will see the 33% taken off. Please realize the Cricut cartridges are already SO LOW, that there is no additional sale on them, but realize you will not pay more than $32 for ANY Cricut cartridge, even the BRAND NEW ONES!!!!
Our new items in the store......
More adhesives, Xyron Creatopia and accessories, More ink, Glimmer mist-Tattered Angels, Cinch, Candi, E-clips, I-top, Crop-a-dile, Slice, Making Memories, We R Memory Keepers
We really expanded our paper Category and Martha Stewart
We added over 500 Martha Stewart items this week!
So here are a few categories and brands and we are adding everyday.
As new vendors come in we are going through a little bit longer shipping process while waiting for the first order with that company to come in. But the orders after that are coming in within about 2 days. So I am placing smaller first orders so the subsequent orders will come in faster. So before we list new items for sale, we get them in first :) It is working out much better and faster!


Also there will be 14 new companies added this week and the same goes until May 13th!

ALL Cricut Cartridges are $15-$32

Everything else is 33% off until... May 13th
Shipping time right now is down to 3-7 days.


Have a crafty day! 
Hugs 
Sarah
Monday, April 30, 2012

Today's letter is R


Hi Guys! Its that time again for the letter of the day over at My Cricut Craft Room.


I recently got the tag bags boxes and more 2 cart and I had to use it on a project. I found the cutest recipe box on page 32.  At first I didn't realize that I needed to cut it using the box 1 and box 2 sections and I just cut the shape at 8". Well to my surprise I ended up with a cute little box. 


The purple is cut in one piece at 8" and the green is the same box using the box1 and box2 cuts @8"


I just wanted to show the differences in the size.


For my box I cut it out of Recollection Garden Harvest Kraft cardstock pack. Like I said at 8"


after assembling the box which is quite easy I decorated it with ribbon and roses from the flowershoppe cart. 


I cut the roses at 2", 2 1/4 and 2 1/2


I inked them up with tim holtz worn lipstick and dusty concord. I added rhinestones to the center. 
I used glue dots to attach them to the lid


Here a few pics of the box and flowers


I think that I will keep this box on my desk to add business card to. It is the perfect size for them and instead of a recipe box I have an organizer for business cards. 


Thanks for stopping by. Please leave me comments and let me know what you think.


To see more projects like mine head over to Erica's blog
Sunday, April 29, 2012

Home Made Glue dots!

Hi everyone and happy Sunday! 
I have a quick tip for all of you on how to make homemade glue dots. 


super easy 
what you need 


wax paper or slick paper off of vinyl. 


make drops of the glue any size that you want on to the paper.
let them dry overnight and they will dry completely. 


These little dots are very sticky. and they hold very well. I made about 100 dots and barely used any of the glue. 


Bonus: you can use the tack it over and over glue and water to re-stick you cricut mats
Just mix it 50/50 and brush on and let dry.


Ok so have a great weekend!

Crafty hugs Sarah

Thursday, April 26, 2012

Theme day Thursday Today's Theme: Beach


Hi all and welcome to another Theme day Thursday at My Cricut Craft Room. 

Today's Theme is the beach. When I think about the beach I think bright colors, sunsets, relaxing,cool breezes and flip flops. which by the way I wear all the time. I hate wearing tennis shoes. My hubby always jokes that I would wear flip flops in the snow, which I have. I have more flip flops than any other shoes. So of course I had to use them in my beach theme.
I have created 2 cards for you today.

For this card I used Life's a beach cricut cartridge. 
I cut them from page 64 @3.5" I used a quickcuts embossing folder on the flop and inked them with tim holtz. I add a silver brad to the toe hole. 
The card is 4X4. The dot paper is 3 3/4 square and then i used the spots and dots cuttlebug folder on the green paper which is 1 3/4 by 3 3/4. I wrapped some pink and white twine around the card. I added some pink paper and rounded the corners. 
I used a pink by design stamp from the summer vacation set and made a banner.

Card 2
This cut was also made from life's a beach pg 81 cut @ 2.9
The palm is from pg 40 cut @ 4.0

I printed and cut the back ground papers from the snapshot nature cartridge on my imagine.
I added some twine to add to the beachy feel. 
The sentiment is from the summer vacation by Pink by design. 


Thanks for stopping by. Please leave me a comment and let me know what you think.

To see more projects like mine please visit My Cricut Craft Room.

Tuesday, April 17, 2012

Sketch and Color Challenge over @ My Cricut Craft Room

Hi All! I hope you week is off to a wonderful start. 
This week over at My Cricut Craft Room the card sketch and color challenge is to use the colors apple, grape and blueberry ( or green, purple and blue) and this sketch.


This is my first time ever using a sketch and I have to say that I had a lot of fun playing along.

here is the card that I made.


I used my G to create a window card I think that I used George and basic shapes for the square and then for the scalloped square I used accent essentials.


The puppy is from Create a Critter. 
The tree and flowers are from Bloom 
The birds are from everyday pop up cards 
The bunnies are from sugar and spice. 


close of the window


This challenge runs until the 24th of April.  I hope that you will play along. 
The winner of the challenge will receive a $15 gifts certificate to Erica's craft room store

To enter the challenge please link up to the inlink on Ericas blog or you can check out below for all the details and to link your project.


Monday, April 16, 2012

My Imagine-ation Monday @ My Cricut Craft Room


Hello and Happy Monday!
It is time for another Imagine-ation Monday over at My Cricut Craft Room.
That means on Monday the Design Team makes a project with either the Imagine, E2 or Cricut mini.


I will give you a peek at my project that I created on my Imagine and then we will get started with the details.

Ok so on to my card
Recipe for success:
Kate's kitchen imagine cartridge 
       pg. 17 I print and cut the image in the layers 2 times at 2.9"
pg. 25 cut 2 times at 1"
Imagine more imagine cartridge
pg 29 the bonus image card cut @ 8"

I cut the tea pot from kates kitchen in the layer mode and cut 2 of each. 
I then added foam tape to one layer and popped them up to add dimension. 


This is the bonus card from the Imagine more cart. I cut it at 8 in and  then scored it at 4 in.


                          This is the glue that I used to adhere the cuts to my card.


                                  Here is the card assembled. So cute. I just love my imagine.

It had to see but I added some stickles around the banner and a few spots on the yellow bottom.  


I hope you enjoyed my card. To see more projects like mine please visit My Cricut Craft Room


Crafty Hugs!
Sarah

Monday, April 9, 2012

Outta this world, Letter of the day

Hello and Happy Monday! Today is Letter of the day over at My Cricut Craft room. Today's letter is O.


For Today's project I made a birthday card for a little boy.
Here is a sneak peek
                                       
Ok so lets get started!

I used the Nifty Fifties Cricut Cartridge to cut the rocket from page 28 ( row 1 button 8) at 3 1/2 inches.  


after gluing together I embossed the stars with Martha Steward glitter embossing powder in sugar cube.

For the card
Card base: craft card stock cut at 5 1/2 by 8 and folded in half
red dot paper cut @ 5 1/4 by 7 3/4  ( this paper is from Imaginisce Happy camper collection)
stripe paper: cute at 5 by 7 1/2 ( this paper is from Echo park summer days collection 6x6 pack)
blue banner cut @ 1 1/2 by 5 1/2 and notched at ends to create banner


I used a versa mark pen to write the copper words then embossed with inkadinkadoo embossing powder in copper.  the birthday stamp is from TPC STUDIOS
I added 3 brads from my stash to hold the banner on to the card.


I popped up the rocket on foam tape. I think it turned out cute but I don't like my hand writing on it but remember No Mistakes in paper crafting so I left it. 

Thanks for  stopping by and checking out my project. To see more Letter O projects please visit My Cricut Craft Room


Until next time! 
Sarah